45 Degree Angle Dop

Mike also made me a custom 45 degree angle adapter for cutting and polishing the table on stones. You can read about the issues with the original Omni-e angle dop supplied by Jersey Instruments on this post 45 Degree Angle Adapter Defect from David Hudson.

I actually have had and used this new 45 degree angle adapter for at least a couple of months now. It’s a solid and extremely well-made piece, weighing in at about 4 oz/120 grams. It is machined from a single piece of brass, which means there is no way it can slip out of alignment.

Custom 45 Degree Angle Adapter for the Omni-e Faceting Machine

In the photos I’ve removed the top dop-holding screw to show the nylon tip – a very well-thought part of this adapter’s design. It prevents the holding screws from scarring the soft brass of the dops.

The 45 degree angle adapter is heavy. Along with the nylon-tipped screws this helps reduce the amount of squealing tha tthe stones make when grinding and polishing the table. The squeal-factor with this new table adapter is almost zero so far – with the original Omni-e table adapter I often would hold the stone or dop to try and dampen down the noise. I also took to wearing earplugs.

The final additional benefit of this adapter is that you can use it to validate the calibration of your Omni-e faceting machine’s angle read-out. Because it has a flat bottom, you can insert it into the quill and then lower the faceting head until the angle adapter is sitting flush on the lap. Your angle read-out should be 45 degrees; if not, you know it needs adjustment.

This particular 45 degree angle adapter is machined specifically for the Omni-e’s 0.300″ dops

Unfortunately Mike is no longer in the business of making parts for faceting machines.

Posted in Blog, Omni Modifications | Tagged , | 2 Comments

120 Index Gear

My friend Mike made me a custom 120 Index Gear for my Omni-e. Jersey Instruments does not make a 120 Index Gear and told me that the gear pitch was too small to manufacture.

120 Index Gear for the Omni-E Faceting Machine

This index gear is machined from aluminum and has engraved markings. The original index gears that came with my Omni-e have painted-on numbers and markings – these wear off through use. More critically, the paint can be dissolved and wiped from the gear if you happen to get a solvent like Refractol on it by accident – I can confirm this with my 80 Index from Jersey Instruments.

The 120 Index Gear that Mike made works like a charm. The center hole was a bit tight so I had to sand it out – I’ve informed Mike of that problem and he is loosening off the tolerances of his machining to account for the vaguarities of the parts on the Omni-e. The index pin does not seat completely into the groove but this is not an issue – it sits deep enough to hold the quill in the appropriate setting without fear of it jumping out or being knocked loose.

Unfortunately Mike is no longer manufacturing these parts and his old domain has been taken over by some Chinese company.


Posted in Blog, Omni Modifications | Tagged , | Leave a comment

Resolving the Swing Arm Alignment Problem

Well, this is the way I’ve managed to get rid of the alignment problems between the Base Plate, Swing Arm, Mast and Platen assemblies. A bit extreme, but it definitely gets rid of at least 3 separate intractable alignment issues.

What remains now are issues with the design and manufacture of the Faceting Head, Rack and Pinion, and Mast. At least now I can reliably and repeatably set an angle and index, change laps and come back to almost the exact position I need to be. Before, moving the Swing Arm meant that I’d have to use the Cheater to find the exact alignment again. Tedious and completely unnecessary with an effective design and execution.

How To Eliminate the Swing Arm Alignment Problems of the Omni-E Faceting Machine

How To Eliminate the Swing Arm Alignment Problems of the Omni-E Faceting Machine

Posted in Blog | Tagged , , | 2 Comments

Omni-E Digital Encoder

I’ve just posted an article about the Omni-E Faceting Machine’s digital encoder.

I finally got the time and energy to take apart the Omni’s faceting head and encoder and snap some pictures. What did I discover? Nothing that I wasn’t expecting, really.

The Omni-E’s greatest marketing hype has been that it’s a “true digital” faceting machine because it utilizes a digital optical encoder to measure the angle of the faceting head. Most of the competition in the digital faceting head world – Polymetric, Graves Mk 5 (and of course its parent the XS3, which is no longer being manufactured) – use high-tolerance potentiometers to measure the faceting head angle. Though they are digital angle read-outs, the argument has been that using an analog pot to measure the angle is somehow less accurate or inferior to a digital encoder.

You can read the article to discover the truth. The Omni-E I have uses a US Digital E5 Optical Encoder that resolves to 900 counts per revolution. It effectively can measure up to 3600 divisions per revolution by reading the outputs in a specific way. Which means the Omni-E can resolve at best to 0.1 degrees, plus or minus whatever the error is in the encoder. However at least one of the potentiometer-based competitors can repeatably and accurately resolve to 0.02 degrees, five times greater resolution than the Omni’s digital encoder!

Click on this link to read about the Omni-E Faceting Machine’s digital encoder.

-Allan

Posted in Blog | Tagged , | Leave a comment

Omni-E Digital Encoder Disassembly

I’ve opened up the digital encoder used in the Omni-E faceting machine. It’s a US Digital E5 Optical Kit encoder. Click on the link to have a look at the specifications or you can download the E5 specifications in pdf form here. The part number is E5-900, single-ended, 1/4″ shaft.

Omni-E Faceting Machine Head - Digital Encoder Cover Removed

Omni-E Faceting Machine Head - Digital Encoder Cover Removed

DO NOT REMOVE YOUR ENCODER DISK FROM THE FACETING HEAD SHAFT!

The disk needs to be a certain distance from the detector in order to operate correctly. If you do not have the spacing tool or a way to set this distance correctly after removing the encoder disk, your encoder may not function correctly. (If you happen to mess it up despite my warning, to re-assemble correctly the ink-side of the encoder disk should be 0.025″ from the detector – the side closest to you)

Faceting Head and Digital Encoder Disassembly Photos

Please do not try this yourself unless you know EXACTLY what you are doing and how to put it back together with the correct encoder disk spacing. And, in case you didn’t realize it, doing this will void your warranty.

Omni-E Faceting Machine Head - Digital Encoder Disassembly and Removal

Omni-E Faceting Machine Head - Digital Encoder End View

Omni-E Faceting Machine Head - Digital Encoder Disassembly and Removal

Omni-E Faceting Machine Head - Digital Encoder Disassembly and Removal

Omni-E Faceting Machine - Faceting Head with Digital Encoder Removed

Omni-E Faceting Machine - Faceting Head with Digital Encoder Removed

Omni-E Faceting Machine - Faceting Head Bearing and Shaft

Omni-E Faceting Machine - Faceting Head Bearing and Shaft

Omni-E Faceting Machine - Faceting Head Bearing Exposed

Omni-E Faceting Machine - Faceting Head Bearing Exposed

Omni-E Faceting Machine - Faceting Head Shaft and Bearing Cover

Omni-E Faceting Machine - Faceting Head Shaft and Bearing Cover

Encoder Resolution and Techie-Talk

The most interesting thing about the Omni’s digital encoder is that it reads 900 counts per revolution. That means 900 little ticks per complete 360 rotation around the axis.

The Omni-E digital encoder disk is directly coupled to the faceting head shaft so there is a 1-to-1 correspondence between the movement of the faceting head angle and the counts that are recorded in the encoder. While the encoder can have an index pulse to keep track of where in the rotation the head is, the Omni does not utilize this. Thus the head and display needs to be zeroed every time the unit is powered on.

In order to get 1/10 degree readout from the encoder, the Omni electronics are reading the output signals from the encoder using x4 counting. Techie talk: this means reading both the rising and falling edges of the two square wave channels (the channels are offset so you can determine which direction the shaft is turning) in order to get 3,600 pulses per revolution.

This means the maximum resolution that the Omni-E read-out can be accurate to is 1/10 of a degree. With the E5’s stated worst-case quadrature variance of ±33%, this means that the 1/10th digit of the Omni-E can be up to 33% or 0.033 degrees out of accuracy. Another way of stating this is that the Omni-E’s digital encoder angle readout is accurate to 0.1 degrees ± 0.033 degrees or 1/3 of the smallest division.

The likelihood of this large of an error is low however; it is more likely to happen on high-RPM applications rather than the near-stationary use in the Omni.

It does give me pause however. The main selling feature of the Omni is the Digital Encoder vs. the majority of the competition’s analog potentiometers. At least one competitor’s potentiometer is able to repeatably resolve to 0.02 degrees.

To put this into perspective – a competitor’s potentiometer-based faceting head can accurately and repeatably resolve the facet angle that is smaller than the Omni’s potential error range!

As I’ve written before, I don’t care whether the ruler I’m using is plastic, wood or steel. I just want it to be accurate, precise, and repeatable.

If an analog potentiometer meets these requirements, it doesn’t matter that it’s not a digital encoder. Using the “it’s not truly digital” argument just becomes marketing hype and noise.

Posted in Omni Faceting Head | Tagged , , | 2 Comments

Faceting Community Loses A Pillar

Jeff Graham, the owner of Faceters.com and a high-profile member of the faceting community passed away on June 20, 2009.

While I’ve had my disagreements with Jeff I am profoundly saddened to hear of his passing and wish his family well.

His contributions to the community are many and long-lasting. His faceting diagrams and instruction books will live on as his legacy.

-Allan

Posted in Blog | 1 Comment

New – Faceting Rough for Sale

In order to fund my purchase of a new faceting machine to replace the Omni-e, I’m selling off some of my faceting rough collection.

Like most rockhounds I have far more material than I’ll ever get around to cutting. I am posting select pieces from my facet rough hoard on the Faceting Rough for Sale page. I’ll be updating it every so often so please check back.

Terms: First come, first served. All prices are in US Dollars.

Payment: Please send me an email to allan(at)omnifaceter.net with the parcel number you wish to purchase and then I’ll send you a Paypal invoice. I only accept Paypal Instant Transfers, not payment by credit card or e-check.

Shipping: by Canada Post, either parcel post for $15 or express mail for $25. I ship using methods that have delivery confirmation.

Returns and Refunds: You can return the rough for full refund within 20 days as long as it is in the original condition and not altered. Shipping charges will not be refunded.

Feel free to contact me for more information if there is a particular stone or parcel you are interested in.

Thanks and happy faceting!

-Allan

Posted in Blog | Tagged | Leave a comment

Measuring Quill Runout

I’ve had a few emails asking the best way to test the runout on your Omni faceting machine quill. I didn’t take any photos when I did it using a standard dial indicator and stand, and I don’t particularly recommend that method anyhow as it’s not very accurate.

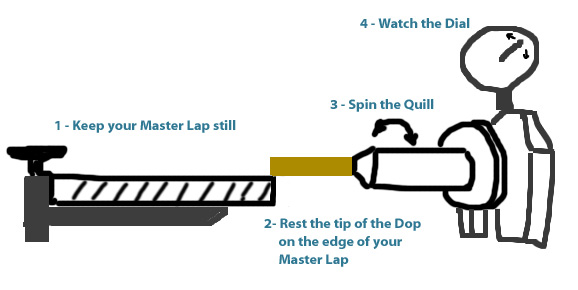
If you have one of the new Omni faceting machines with the dial indicator for depth of cut, you’re in luck! Just put a dop in the quill and arrange the facet head and swing arm so the tip of the dop rests on the edge of a master lap. Leave the angle at 90 degrees and the facet head unlocked so the angle can change. Put the quill in free-wheel mode.

Rotate your dop on the master lap and watch the dial indicator. It will tell you how much wobble is in your quill, and what directions that wobble is worst.

Using the Omni Faceting Machine Dial Indicator to Test Quill Runout

Using the Omni Faceting Machine Dial Indicator to Test Quill Runout

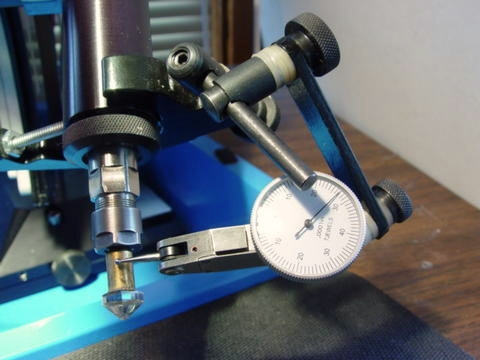
The best way to measure the quill runout is to use a lever dial indicator. Tom B. graciously allowed me to use his photo illustrating how he measured his quill runout on his faceting machine (not an Omni however). He clamped the lever dial indicator to the stationary portion of his faceting head then arranged the indicator so the tip of the lever rested on the barrel of the quill. Spinning the quill now will show you how much wobble is in your quill.

In the case of the Omni faceting machine, the best place to clamp the lever dial indicator is on the faceting head yoke – it’s the part that the quill fits into. Put the quill into free-wheel mode and measure away.

Measuring Your Omni Faceting Machine Quill Runout with a Lever Indicator

Measuring Quill Runout with a Lever Indicator

I hope your measurements are better than the others I’ve been hearing from. Collectively the average quill runout is 0.006″, which is a HUGE amount. I expect the quill runout to be under 0.001″ in order to cut to depth with any accuracy.

By the way – if you happen to own an Omni faceting machine with the depth-of-cut dial indicator AND you have a measurable quill runout, do you think your depth of cut indicator is going to do anything for you? You certainly aren’t going to be able to rely on it to tell you when you’ve reached the same depth of cut on each facet as that depth will change with every index position…

Posted in Blog, Quill Runout | Tagged , | Leave a comment

Omni Digital Encoder Drift

Over the past year and a bit I’ve heard from several people who own Omni-E faceting machines who have trouble with their digital angle readout spontaneously changing degrees without rhyme or reason. I had not experienced that until recently and did not really know what to make of it. Now I’m unfortunately able to write about the problem first-hand.

Much has been made of how the Omni-E faceting machine, along with the new Ultra-Tec digital readout are the only two “true” digital faceting machines available. There’s been a lot of hype over using a digital encoder vs. a potentiometer (“pot”) due to a lot of fear, uncertainty and doubt sowed over the accuracy of the pot used.

My take on things: When I grab a ruler, I don’t care whether it’s made of plastic, wood or metal. I don’t care whether it’s clear or opaque, thick or thin. I don’t care whether it’s aluminum, brass or steel; I don’t care what sort of plastic it’s made from nor what tree it was grown on. Or the country it was manufactured in or the political affiliation of the persons who made it.

What I care about is:

  • it’s accurate, meaning one unit of measure on the ruler is actually the distance it’s supposed to be
  • it’s precise, meaning that I can easily differentiate between the units of measure without a lot of error
  • it’s repeatable, meaning that when I use it to measure something at Time A it gives the same measurement at Time B

It is no good to have a beautifully-polished steel ruler with finely-engraved markings if the markings are not uniform. Why would I want a beautiful ruler that measures 1-1/2″ when in fact the measurement is 1-1/4″? Or one that has the inch marks on it random distances apart, so 1″ is in fact 3/4″ and 2″ is 3-1/2″? The unit markings are very precise and are repeatable at different times of the day, but are completely inaccurate. Beautiful garbage.

Likewise it’s not useful to have a ruler that has perfect unit markings but is elastic, so when pick it up it measures differently the first time than the next. Imagine your ruler with it’s impeccable unit markings measuring 1″ at 3:00 pm and then when you pick it up at 3:03 pm that “inch” is now 0.95″? It’s precise but not repeatable.

So the real question about whether a digital faceting machine angle readout is a good product or not comes down to whether:

  1. it’s accurately measuring the true angle of the dop and quill assembly
  2. it’s precise, showing you the 10ths or 100ths of degrees as desired
  3. it’s repeatable, so when you lift the dop to inspect the facet and lower it again, the read-out still shows the angle you set it to

—-

I’m one of those lucky individuals with an Omni-E digital encoder faceting machine that is precisely inaccurate.

Here’s what happened: during the birth of my daughter I left my Omni-E faceting machine switched on. I normally will leave it switched on up to 2 or 3 days in a row if I’m cutting stones. So far it hasn’t been a problem. However this time, due to the general chaos that surrounds a new baby entering the house, I didn’t get back to my Omni faceting machine for 12 days. I’d pass by it and note that it was still turned on and ready 40.0 degrees, but that’s about it. The machine remained physically undisturbed without being touched or moved all this time.

After day 8 or 9, I noticed that the angle readout changed from 40.0 to 40.1 degrees, all by itself. Strange. However I was too busy to come back and examine it. After day 11, the angle readout now showed 40.3 degrees! All without any human touch.

The temperature in our house is constant at 20C/68F, so I discount thermal changes. Besides, thermal changes should cancel themselves out as the metal expands and then contracts.

I turned the machine off for a day or so, thinking perhaps the electronics were getting overheated. Why this would happen in a well-designed system is beyond me, but the Omni faceting machine has not shown itself to be a well-designed system.

By lucky chance I found myself with an hour of free time, so I powered up my machine again on Day 14. I set the angle and proceeded to cut and polish the crown of a nice garnet. However imagine my surprise when I left the garnet with the last tier of facets left to polish. I got up and left the machine for about an hour, and when I came back the display had changed from 22.6 degrees to 20.3! It magically changed the angle readout by 2.3 degrees in an hour!

I wanted to know if the angle had indeed slipped and changed physically while I was away, so I left it as it was and proceeded to continue polishing. The angle was what it was locked in at as I had no problems polishing the remaining facets. But the angle readout continued to show 20.3 degrees instead of 22.6.

My experience here mirrors what the others have told me – through no actions of theirs, the angle readout changes randomly up or down. A couple have mentioned it appears to be related to things being turned on or off around the house – the furnace, wall lights and so on. In my case I have never experienced this and can’t correlate it to anything.

If indeed it’s related to other electrical items in the house switching on or off, then there is a serious design problem with the electronics power supply. It sounds to me like there is a missing or insufficient smoothing capacitor for the encoder power. Either that or the power supply is missing a RC filter to take out any transients that might be coming in.

So back, back to the first part of this discussion – the Omni-E faceting machine boasts having an extremely accurate digital encoder as opposed to a potentiometer. But due to sloppy design and construction the benefits of that encoder have been lost.

Do I care whether the Omni uses a digital encoder or a potentiometer? Nope. I just want my faceting machine to show me the angle I’m cutting accurately, precisely and repeatably. Which my Omni is not up to.

Posted in Blog, Digital Inaccuracy | Tagged , , , , | 5 Comments

My Latest Gem

Well everyone, here’s my latest gem. Weighing in at a monster 19,250 carats (3.85 kg/8.5 lb)!

Designed and executed by Celine and Allan, this beauty was finally completed at 10:06 pm Monday March 16, after 41 weeks and 3 days of effort.

We call her Juliette, and she’s the only gem I’ve produced recently that has not suffered from the Omni faceting machine’s terrible construction!

My Latest Gem - Juliette!

My Latest Gem - Juliette!

Posted in Blog | 3 Comments